
I’m finally sharing my vocal booth! Enough people have asked about it online that I’ve finally gotten tired of providing the same quick details.
With this post I can share more information in a short amount of time. Plus you can easily bookmark or share this whole article -or- just screenshot what you want. This big plate of information is for you to take what you need, then get on with your life.
I’ll starting by answering “who, what, when, where, and why” then move on to the itemized lists. I’m not sharing the price of every. single. thing. I . bought. But if your entry level budget is around $1,000 you’re in good company.
Disclosure: This site contains affiliate links; I may earn a tiny commission from purchases.
Q. Who are you?
A. I am just me! I am a normal person who wants to voice audiobooks in the future. I do not have any history acting or singing, but I do have professional media experience…that’s ten years old. I thought that producing my own podcast would be a fun way to retain some basic skills while I wait to have book-recording time (I am the primary caregiver for my toddler). I intend to hit the ground running as soon as he’s in school in a few years. So until I can record books, I am happy to host and produce my own podcast, yay!
[📌 Click here to stream Lady Jupiter Podcast online without a podcast player]
Q. What is ‘PCS friendly’?
A. PCS is a military initialism, it means Permanent Change of Station…but it’s far from permanent. It means that we fully move every one to four years, so I needed a booth that can also move with us and remain functional. Majority of military spouses like me are overqualified and underemployed, so portable hobbies and income are essential.
☞ Related: I wrote a PCS Series if you’re similarly nomadic and want to see how we do it
Q. When did you build this booth?
A. I bought each piece of my PCS-friendly vocal booth in 2020. The Jupiter House wasn’t quarantined, but we didn’t have anywhere to go, so I jumped into podcasting after a month of research & planning. I definitely recommend making a solid plan before you buy a single thing.
Q. Where did this all start?
A. This question is charmingly irrelevant. But this started in Central Arkansas, USA. I’ll try to update when we move again, so if I haven’t talked about moving my booth by…2024, drop a comment and ask for an update – I forget what needs refreshing and I welcome reminders.
Q. Why did you build a vocal booth at all?
A. Practice! I constructed this vocal booth so I can start voicing audiobooks for fun. In the meanwhile I use the booth (when possible) to record my podcast.
Said podcast keeps my audio editing skills from getting rusty.
 nomads who like sharing their voice. #LadyJupiter #LadyJupiterPodcast #VocalBooth #PCSfriendly #MilSpouse #podcaster #PCSready #EquipmentList")
 nomads who like sharing their voice. #LadyJupiter #LadyJupiterPodcast #VocalBooth #PCSfriendly #MilSpouse #podcaster #PCSready #EquipmentList")
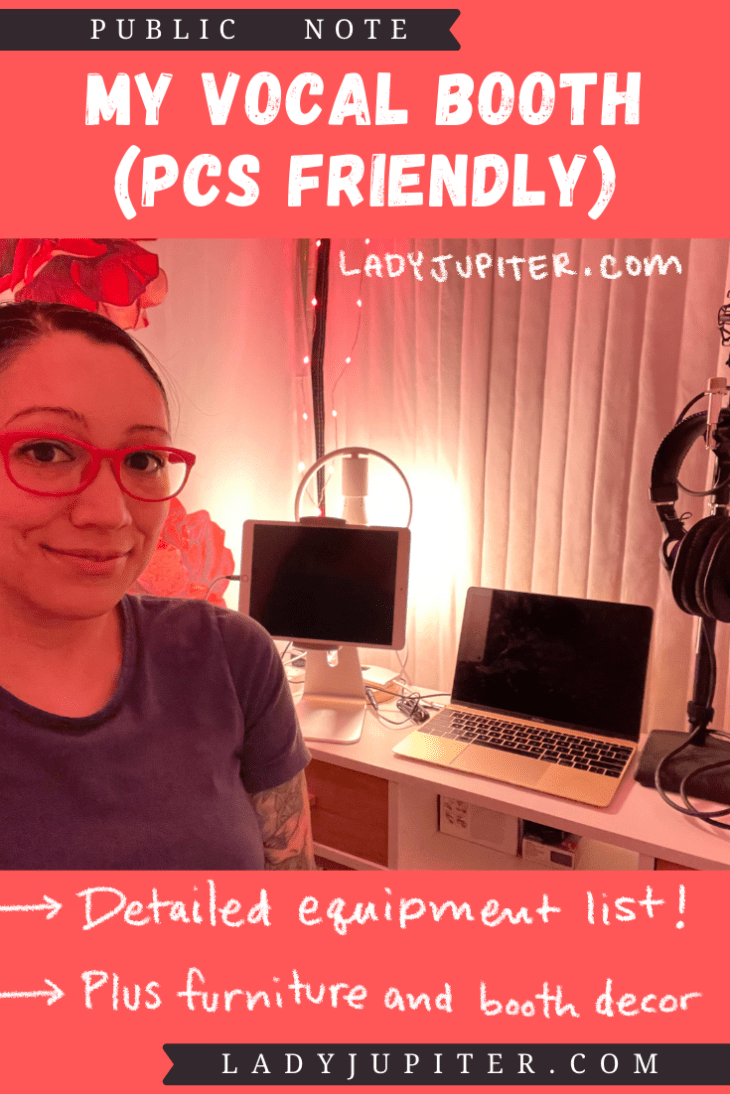
We’ll start with the interior, then move outward.
I use a little console table inside my booth. The drawers have space for little bits like adaptors and instruction manuals. The utility is the surface. The little table (39.4″ white & bamboo – already a dead link) carries my:
- MacBook (silent solid state HD, recording into GarageBand)
- 2015 MacBook 12″ display
- iPad (for script reading, matte filter applied)
- 2019 iPad Air, 10.5″ display
- Aluminum tablet stand
- Matte filter
- Focusrite Scarlet 2i2 (3rd generation, 2020)
- Kick drum mic stand (boom arms were disappointing me, so I used something else. Improvise! Adapt! Overcome!)
- AT2020 (XLR condenser microphone bundle – I use the boom arm as a headphone rest)
- Sony MDR7506 headphones (Sony makes great monitors – these are perfect for my needs)
- FetHead (part of my signal chain to improve volume without using excessive gain)
- Power-capable multiport adapter so I can daisy chain power to my MacBook and interface to the FetHead and mic.
- Lamp (so I can see what I’m doing in there)
- Lamp base (purchased in 2017)
- Philips Hue bulb
- Surge protecter with USB ports (just convenient)
The booth itself is a grow-tent frame that I covered with acoustic blankets; the mylar is in the attic for potential future use as a sauna. I opted for a 48″x48″x80″ frame because the footprint is small enough to cram in the home office (photographed below), and roomy enough for me to move in. Be advised I am 5’3″ and generally slim, your mileage may vary regarding comfort in small spaces. Speaking of comfort I kept my decorations minimal, yet intentional.
- 48″x48″x80″ tent (for the frame)
- (Qty4) 80″x80″ Acoustic blankets to absorb sound reflections, I bought four total
- three with grommets and velcro for the walls
- one plain for the ceiling
- Red LED string lights (because red light is good for your skin AND melatonin production, but evening sessions can get a little sleepy without blue light)
- Small tapestry because it’s pretty
- From Society6
- A kneeling chair (keeps my lungs upright and open)
 nomads who like sharing their voice. #LadyJupiter #LadyJupiterPodcast #VocalBooth #PCSfriendly #MilSpouse #podcaster #PCSready #EquipmentList")
 nomads who like sharing their voice. #LadyJupiter #LadyJupiterPodcast #VocalBooth #PCSfriendly #MilSpouse #podcaster #PCSready #EquipmentList")
Not pictured: spare 6′ XLR cable hanging from the ceiling. You need duplicates for trouble shooting signal chains. That said, I don’t have duplicates of everything right now, but I will in the future. My next duplicate item will be a different interface, then a different microphone. I’ll probably find what I want at local pawn shops – I just need to go out and search.
Overall, everything cost me $1,050 USD in 2020.
This does not include the MacBook and iPad because I bought those for other reasons, meaning that I had them handy and didn’t need to buy them for my booth. Oh, same with the lamp base, Hue bulb, and tapestry – they were all in the house and not purchased specifically for this booth.
Exact prices are irrelevant because prices change, objects become unavailable, besides…you’re not my accountant. This entire post is just for reference, not for exact duplication. My booth fits my needs and personality, but you’re not me. Build a booth that meets your needs and reflects your personality – then show me pictures! I love seeing everyone’s booths.


Fantastic setup! With a few tweaks, you could convert this into an ASMR recording booth.
LikeLike